

[2021-06-19 – updated steps for installing the Dell.com Intel command center app]
- Introduction
- Qualcomm Adreno GPU systems (Surface Pro X):
- Intel or Intel+NVIDIA GPU systems
- AMD GPU systems (Surface Laptop 3/4, etc)
- References
Introduction
Does the brightness of your Windows laptop screen appear to flicker like it has a mind of its own? If so, you may have already tried one or more of the following solutions:
- Disabling adaptive brightness in Windows 10/11 settings
- Settings – System – Display – uncheck “Change brightness automatically when lighting changes”
- Disabling content adaptive brightness/contrast in Windows 11
- Settings – System – Display – uncheck “Help improve battery by optimizing the content shown and brightness”
- Applying a widely cited FeatureTestControl=9250 regkey modification via a DPST control script or manual registry edit for Intel GPU systems
On some versions of Windows and GPU drivers, these methods won’t work 100% and you may still get brightness and flickering issues as the hardware and software struggle to balance power consumption vs image quality & consistency.
Similar issues happen across Intel, AMD and Qualcomm based systems. Below are a set of steps you can take to mitigate these issues.
Qualcomm Adreno GPU systems (Surface Pro X):
Unfortunately, there is no control panel for Qualcomm GPUs but the following steps can reduce flickering for many users:
- Ensure firmware is up to date
- Select the battery icon on the Windows taskbar
- Move the slider to the Best performance setting
- Start – Device Manager
- Scroll down and open “Sensors”
- Double-click “HID Ambient Light Sensor”
- Click “Driver” – “Disable device” – “Yes”
Please share your findings with these settings. In particular, please report whether you still see flicker/dimming symptoms in office apps, full screen video/movies, or gaming/3D graphics workloads on and off AC/Mains power.
Update: Try this BETA driver download from Microsoft: https://aka.ms/x64previewdriverprox
Intel or Intel+NVIDIA GPU systems
- Download the Intel Command center from the Microsoft Store (works for most systems – but see step 4 for an alternate Dell.com version which enables more settings)
- Change settings – Open the Intel Graphics Command Center app and change the settings:
- If the app won’t run, settings mysteriously revert to defaults, or if settings are missing or greyed out, install the latest official Intel.com GPU driver, reboot, and then re-run the app.
- If settings are still missing, goto step 4 and install the Dell.com version of the command center app which reveals more settings on some systems – then return here
- Start – Intel Graphics Command Center
- System – Power
- if available, switch “Display Power Savings” and “Adaptive brightness” off
- if available, switch “panel self-refresh” off to workaround periodic freezing issues on Surface Pro 4 and other systems
- Apply
- Yes

- Optional – Select the battery icon on the Windows taskbar and move the slider to the Best performance setting
- Optional – Install Dell.com version of the Intel Command Center to reveal more settings:
- enable side-loading or developer mode in the Windows settings app
- Uninstall all previous versions of the Intel command center app.
- Download the Dell.com version of the Intel Command Center app
- double-click the .exe file and select “extract”
- right click and create a new folder named “dell”
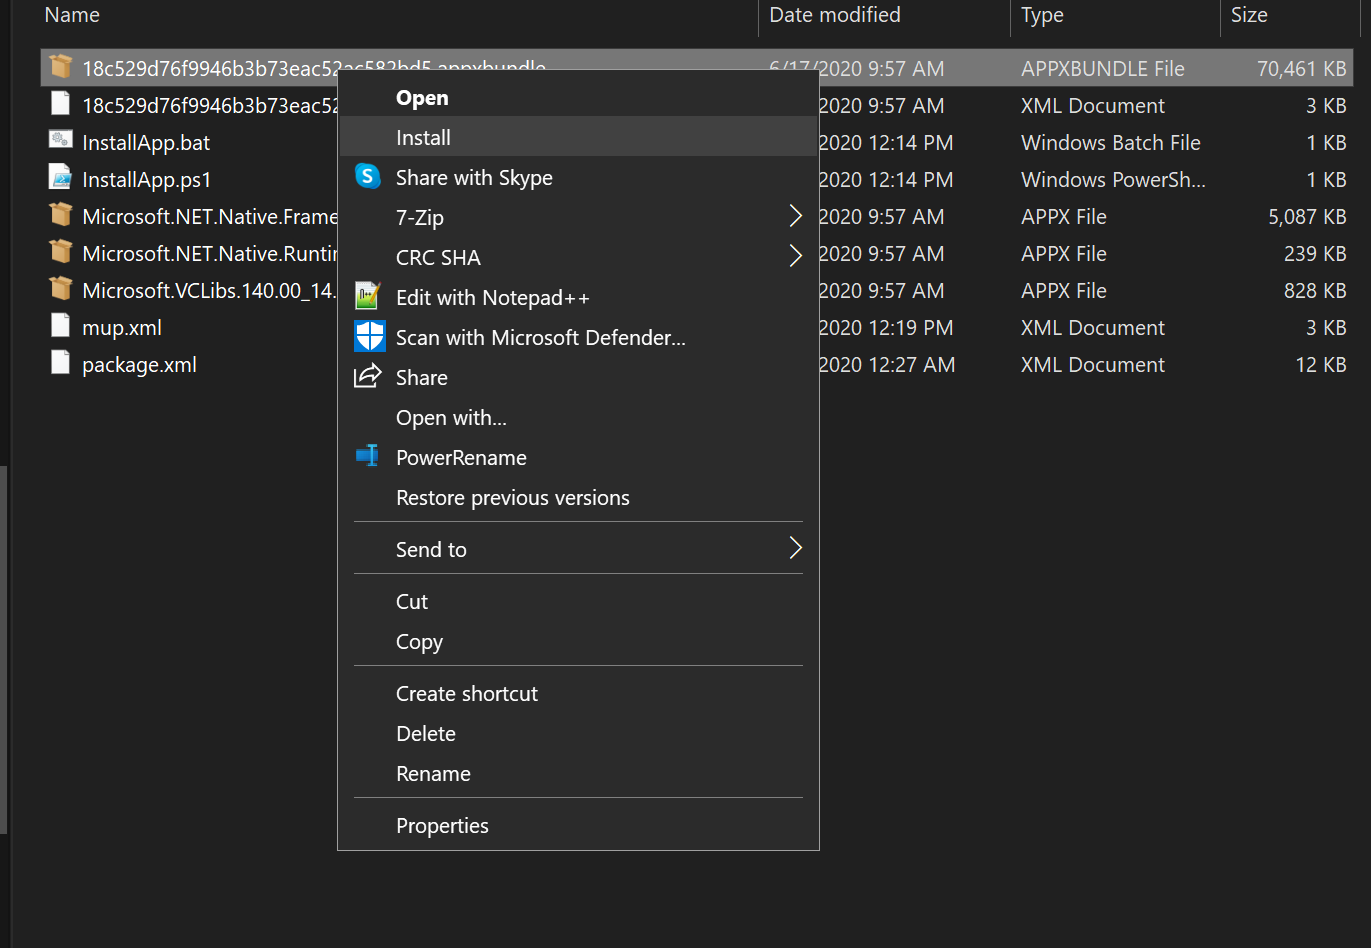
- select the newly created “dell” folder a folder and proceed with extraction. (you can also use the 7-zip tool to extract)
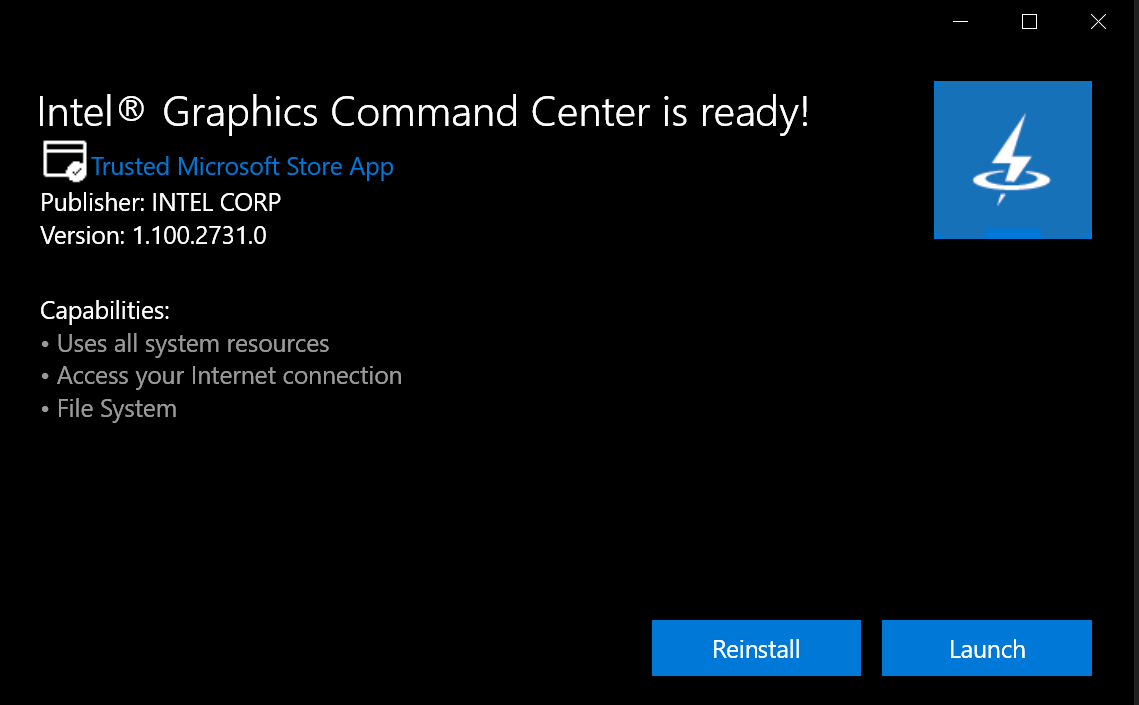
- Once extracted, right-click the 18c529d76f9946b3b73eac52ac582bd5.appxbundle file which will reveal an “install” option. Click install.
Alternate Solution for Intel – regkey method:
An alternative to applying settings manually via the Intel command center app is applying the regkey settings directly. This can be particularly helpful for IT admins deploying multiple systems where callbacks due to the flickering is expected. This approach may not work for all systems and depending on which version of the Intel GPU drivers are installed, some registry keys may not be present.
Windows Registry Editor Version 5.00
;Disable DPST on Intel UWD/DCH drivers - dancharblog
;
; -----Instructions: -----
;- copy this text into notepad
;- save as DPST-off.reg
;- double-click the file and follow the prompts to import changes
;- reboot
;- if the changes don't do anything, in the line below that starts with "[HKEY_" change "\0001" to "\0000" or "\0002" and retry the above steps
; ------------------------
;
[HKEY_LOCAL_MACHINE\SYSTEM\CurrentControlSet\Control\Class\{4d36e968-e325-11ce-bfc1-08002be10318}\0001]
"ACUserPreferencePolicy"=dword:09020000
"DCUserPreferencePolicy"=dword:09020000
"DisplayFeatureControl"=dword:000003e3
"Dpst6_3ApplyExtraDimming"=dword:00000000
"FeatureTestControl"=dword:00008200
"PowerAcPolicy"=dword:c1bac1ba
"PowerDcPolicy"=dword:c9bac0b8
"PowerDpstAggressivenessLevel"=dword:00000001
"PowerGpsAggressivenessLevel"=dword:00000001
"PowerPlanAwareFeatureSettings"=hex:ff,ff,00,00,00,00,00,00,00,00,00,00,00,00,02,01,02,00,00,00,02,01,02,00,02,01,02,01,02,00,02,01,02,01,02,00,02,01,00,00,00,00,00,00,00,00,00,00,00,00,00,00,00,00,00,00,00,00,00,00,00,00,00,00,00,00,00,00,00,00,00,00,00,00,00,00,00,00,00,00,00,00,00,00,00,00,00,00,00,00,00,00,00,00,00,00,00,00,00,00,00,00,00,00,00,00,00,00,00,00,00,00,06,00,00,00,04,00,00,00,00,01,00,00,06,00,00,00,04,00,00,00,00,01,00,00,06,00,00,00,01,00,00,00,00,01,00,00,06,00,00,00,04,00,00,00,00,01,00,00,06,00,00,00,04,00,00,00,00,01,00,00,06,00,00,00,04,00,00,00,00,01,00,00,06,00,00,00,04,00,00,00,00,01,00,00,06,00,00,00,04,00,00,00,00,01,00,00,06,00,00,00,04,00,00,00,00,01,00,00,06,00,00,00,04,00,00,00,00,01,00,00,06,00,00,00,04,00,00,00,00,01,00,00,06,00,00,00,04,00,00,00,00,01,00,00
How to determine regkeys adjusted via the Intel Command center app:
I used the Procmon utility from SysInternals.com to track the exact regkey changes when using the Intel Control Panel UI. Here are some of the records that changed:
1:32:51.9971838 PM GfxCentennial.exe 5156 RegCreateKey HKLM\System\CurrentControlSet\Control\Class\{4d36e968-e325-11ce-bfc1-08002be10318}\0001 SUCCESS Desired Access: Write, Disposition: REG_OPENED_EXISTING_KEY
1:32:51.9972349 PM GfxCentennial.exe 5156 RegSetValue HKLM\System\CurrentControlSet\Control\Class\{4d36e968-e325-11ce-bfc1-08002be10318}\0001\PowerPlanAwareFeatureSettings SUCCESS Type: REG_BINARY, Length: 256, Data: FF FF 00 00 00 00 00 00 00 00 00 00 00 00 02 01
1:32:51.9973189 PM GfxCentennial.exe 5156 RegCloseKey HKLM\System\CurrentControlSet\Control\Class\{4d36e968-e325-11ce-bfc1-08002be10318}\0001 SUCCESS
1:32:51.9973375 PM GfxCentennial.exe 5156 RegCreateKey HKLM\System\CurrentControlSet\Control\Class\{4d36e968-e325-11ce-bfc1-08002be10318}\0001 SUCCESS Desired Access: Write, Disposition: REG_OPENED_EXISTING_KEY
1:32:51.9973773 PM GfxCentennial.exe 5156 RegSetValue HKLM\System\CurrentControlSet\Control\Class\{4d36e968-e325-11ce-bfc1-08002be10318}\0001\DCUserPreferencePolicy SUCCESS Type: REG_DWORD, Length: 4, Data: 131072
1:32:51.9974273 PM GfxCentennial.exe 5156 RegCloseKey HKLM\System\CurrentControlSet\Control\Class\{4d36e968-e325-11ce-bfc1-08002be10318}\0001 SUCCESS
1:32:51.9974438 PM GfxCentennial.exe 5156 RegCreateKey HKLM\System\CurrentControlSet\Control\Class\{4d36e968-e325-11ce-bfc1-08002be10318}\0001 SUCCESS Desired Access: Write, Disposition: REG_OPENED_EXISTING_KEY
1:32:51.9974809 PM GfxCentennial.exe 5156 RegSetValue HKLM\System\CurrentControlSet\Control\Class\{4d36e968-e325-11ce-bfc1-08002be10318}\0001\ACUserPreferencePolicy SUCCESS Type: REG_DWORD, Length: 4, Data: 131072
1:32:51.9975289 PM GfxCentennial.exe 5156 RegCloseKey HKLM\System\CurrentControlSet\Control\Class\{4d36e968-e325-11ce-bfc1-08002be10318}\0001 SUCCESS
1:32:51.9975456 PM GfxCentennial.exe 5156 RegCreateKey HKLM\System\CurrentControlSet\Control\Class\{4d36e968-e325-11ce-bfc1-08002be10318}\0001 SUCCESS Desired Access: Write, Disposition: REG_OPENED_EXISTING_KEY
1:32:51.9975823 PM GfxCentennial.exe 5156 RegSetValue HKLM\System\CurrentControlSet\Control\Class\{4d36e968-e325-11ce-bfc1-08002be10318}\0001\PowerDcPolicy SUCCESS Type: REG_DWORD, Length: 4, Data: 3384453560
1:32:51.9976303 PM GfxCentennial.exe 5156 RegCloseKey HKLM\System\CurrentControlSet\Control\Class\{4d36e968-e325-11ce-bfc1-08002be10318}\0001 SUCCESS
I then exported the registry keys before and after changing the settings.
AMD GPU systems (Surface Laptop 3/4, etc)
- Select the battery icon on the Windows taskbar
- Move the slider to the Best performance setting – this will resolve some, but not all flickering issues.
- Install the AMD Radeon settings app from the Microsoft Store (Note – if this version fails to install, complete step 3 to install the AMD.com drivers. If this step succeeds, skip step 3)
- Install latest AMD.com Radeon GPU driver and control panel on Surface:
- Download the latest official .exe Radeon driver from amd.com
- Start – Device Manager
- Navigate to “Display Adapters” and double-click the AMD Radeon device
- Driver tab -> Update Driver -> Browse my computer… -> Let me pick…
- Scroll to the bottom of the list and click “Microsoft Basic Display Adapter”
- Click “Next”
- External monitors will switch off and the screen resolution, refresh rate, and color profile may change
- Close Device Manager
- Double-click the .exe driver downloaded from amd.com and follow the prompts
- Reboot
- Open the Radeon settings app and navigate to “Display”
- If an option for “Vari-Bright” is available, disable it.
![csm_rad2_69b89737b5[1]](https://dancharblog.wordpress.com/wp-content/uploads/2019/04/csm_rad2_69b89737b51.png)
Alternate solution #1 – Legacy Catalyst Control Panel method
Another solution is using the legacy AMD Catalyst Control panel which can set the vari-bright regkey and disable the FreeSync option which can cause related issues. The Catalyst package is quite old and may not run properly on newer systems, so is not recommended for general use but you can try these steps:
- Open the control center
- Goto Power – Powerplay – ensure “Enable Vari-Bright” is not checked
- Goto “My displays” (or similar) – Properties – ensure FreeSync is disabled
Alternate Solution #2 – regkey method
Windows Registry Editor Version 5.00
;Disable Vari-bright on AMD UWD/DCH drivers - dancharblog
;
; -----Instructions: -----
;- copy this text into notepad
;- save as varibright-off.reg
;- double-click the file and follow the prompts to import changes
;- reboot
;- if the changes don't do anything, in the line below that starts with "[HKEY_" change "\0001" to "\0000" or "\0002" and retry the above steps
; ------------------------
;
[HKEY_LOCAL_MACHINE\SYSTEM\CurrentControlSet\Control\Class\{4d36e968-e325-11ce-bfc1-08002be10318}\0001]
"PP_VariBrightFeatureEnable"=dword:00000000
References
- https://mspoweruser.com/how-to-disable-adaptive-contrast-in-windows-10-on-your-surface-pc/
- https://support.microsoft.com/en-us/help/4548623/adaptive-brightness-and-contrast-on-surface-devices
- https://github.com/orev/dpst-control
- https://dancharblog.wordpress.com/2018/12/09/installing-intel-uwd-gpu-drivers-on-surface-and-other-oem-laptops/
- https://www.winhelponline.com/blog/process-monitor-track-events-generate-log-file/
- https://en.wikipedia.org/wiki/Intel_Display_Power_Saving_Technology
- https://mikebattistablog.wordpress.com/2016/05/27/disable-intel-dpst-on-sp4/

Thank you for posting this. It still dims for me when i view something dark on the screen (drives me nuts when editing photos – i’ve selected dark mode on photoshop and capture one) but just momentarily. Definitely not as aggressive as before. I can also see that “PowerDpstAggressivenessLevel” is changed on the fly by intel command center. Happened only once so far but something to keep in mind.
Once again thanks!
LikeLike
Hey Dainius ,
Have you solved this annoying genius “Adaptive brightness” function that users are forced to ADAPTE with?
If you haven’t, here are some tips:
I have tried it and it works!!!
Just follow the dude’s instructions and change the value “200”(hex) to “cff0”, and you will find the heaven:)
Hope this would help you!
LikeLike
Reporting here that “PowerDpstAggressivenessLevel” is reverted back to default value after every restart. But still, it’s an easy fix when you know this.
LikeLike
Hey,
What about the new Surface Go 2 ? My number for FeatureTestControl is 8200.
Could you help me out ?
LikeLike
The Go 2 uses the same Intel drivers so best to load up the Intel Command Center app and change the settings there. If you want to do it via the registry you’ll have to change a lot more than FeatureTestControl.
LikeLike
Thanks, i used it but i don’t have the same options as the screenshot shows but i’ll see.
LikeLike
The DPST-off.reg reg file doesnt work when you copy paste it and run, Windows says it is not a reg file. Please correct it or put a reg file on the blog.
LikeLike
Sorry about that. The first line in the .reg file should be Windows Registry Editor Version 5.00, not the comments. I’ve updated this above.
LikeLike
Will this also work for other devices, not just Surface? I have a Dell XPS 15 9570, and I am just hating Intel so much, because recently, it started again, that this damn automatic dimming kicks in, and is buggy, when you switch from battery back to power chord, and it still dims. The only way to fix this is to reboot Windows 10. The most disgusting thing is, there is NO option anymore with latest Intel drivers in this damn UWP app for power chord, it is now missing, and you cant disable the power saving options anymore. Intel is a total joke.
LikeLike
Yes all this ought to work on Dell too.
Try running the BETA version of the Intel app: https://www.microsoft.com/en-us/p/intel-graphics-command-center-beta/9nmr79ztjftc
LikeLike
Sadly the damn beta app causes a bug, that the fans kick in for no reason for a few seconds if you switch to modern standby, with the Intel Beta app installed… also with the beta app, the power chord tab is there, BUT the dimming option is missing! Just the option for screen self refresh is there… I love Intel.
LikeLike
Well that is disappointing. Would you mind posting the contents of this registry key: Computer\HKEY_LOCAL_MACHINE\SYSTEM\CurrentControlSet\Control\Class{4d36e968-e325-11ce-bfc1-08002be10318}
Just run regedit.exe then, navigate to this location, right click on it and select “export”. Then post the contents of that file to http://pastebin.com or a similar website.
The contents of the regkey may offer clues as to what is wrong.
LikeLike
anything on it? you never wrote back. I still have this issue…
LikeLike
Sorry no major developments here. Best I can offer is for 10th gen and earlier Intel CPUs is to install the legacy/non-DCH drivers which has the old control panel: https://downloadcenter.intel.com/download/28289/Legacy-Intel-Graphics-Driver-for-Windows-10
LikeLike
how incompetent is Intel actually? I wrote to them about the issue and they told me I should install the drivers from Dell and not their own. seriously?
LikeLike
Yeah that sounds like Intel 1st layer PC/Windows tech support: pass the buck to the OEM vendor. Then OEM passes it back to Intel and user is left frustrated and goes to Chromebook or Mac after umpteen useless suggestions to reboot and refresh the OS…
Speak with your wallet and do a warranty claim or RMA with your PC vendor. Its the only thing that absolutely costs the vendors money and makes them care. Just having an agent answer the phone can cost a vendor a flat rate of $10-15 depending on who they are contracting with…. staying on the line to get to lvl2/lvl3 or having 1-2 follow-up calls basically eliminates ANY profit they made on the PC sale. Have enough of those across a model family and they will take notice…
LikeLike